March 29, 2007

We broke out the moves!

Saturday evening was historic for CMSS, the city of Pittsburgh, and the world. With practically the whole team out in force, we laid four and one half layers of fiberglass onto our mold. To optimize the number of people able to work, we assigned everyone a job. There were epoxy mixers/pourers, epoxy rollers, and those who laid the cloth on the plug. We were also fortunate to have Dick Jones, founder of the Pittsburgh Film Making Institute and now good friend of the team, catching the whole process on video. We also used a computer to capture a time-lapse movie of the 2-3 hour job. This movie will be uploaded to the CMSS Homepage shortly. All and all, the whole process went as smoothly as hoped. The hours and hours of sanding, painting, more sanding, and painting of the plug really paid off.
When we finished laying the fiberglass and other materials over it (as explained in the previous post), we sealed the vacuum bag and flipped on the pump. I believe SAE's Billy Burke got the honor of doing this since he was extremely generous with his advice and time building the plug. After the pump was on, we cleaned and let the boat set over night to harden.
We returned to the boat yard last night to begin removing the plug from the hardened fiberglass. In theory, the plug should have easily popped out, but quite the opposite occurred. Everyone we talked to said the mold is never easy to remove, and they were right. We used chisels, drills, hammers, jigsaws, hands, feet, and handsaws to remove the foam. It was a delicate process, but with the steady hands of CMSS's best, all the foam was removed. After a long night of foam removal, we finally had a fiberglassed hull. It is a beautiful thing.
Now that the hull is done, we now will insert some ribbing to brace the hull form. We are having a design review, complete with elections for next year's officers tomorrow evening at 4:30PM in PH126A. Feel free to stop by and see what all the groups have been working on.


And now for some pictures taken by the often imitated, never duplicated, Mark Fuge:

The team stands by as the crane is used to flip the boat right side up.

It took many hours of brute force to remove the foam plug.

An aerial view of the hull and a few people digging away the foam.

A view from the inside of the bow looking towards the stern. Most of the foam has been removed at this point.

Stayed tuned for more....
-Andrew

March 23, 2007

Preparing for the big dance!

Over the course of the past week, we have begun to prepare for the big dance, fiberglassing!!
Plug (the hull mold) construction is finally complete after some wet sanding, making it as smooth as a baby's bottom.
As much as all of us here wish we could just lay down some fiberglass, slop on some epoxy, and go home for the night, we cannot. Fiberglassing involves several steps to ensure a top-notch product. Most of the prep work has been, or is being done so we can begin tomorrow evening. Today, the hull group and others cut and organized various materials needed to fiberglass. There are four layers of material in the fiberglassing process. First, the fiberglass cloth is covered in a slow-curing epoxy and laid smoothly across the hull. Over the fiberglass is a plastic perforated sheet, which allows excess epoxy to seep through. On top of the perforated plastic sheet is a felt like material called breather. The breather absorbs some of the excess epoxy and is covered by the fourth layer, the vacuum bag. Inside the vacuum bag are custom build tubing and hoses that connect to an air pump. The pump sucks air from the vacuum bag creating a higher than atmospheric pressure on the fiberglass.
The whole process is labor intensive, especially for a mold of our size. To practice, we made a few model hull shapes and fiberglassed them. You can see the models below. We also have gone through and done a dry run. It's very similar to doing a show actually. We have the "set" completed, but now are just making sure our queues and dance steps are perfect.
If all goes well, you shall see some pictures of a fiberglassed mold by the weekend's end!

And now, the crowd favorite, the pictures!


The material on top of the table is the fiberglass and the blue (at least that's what my colorblind eyes see) material below is the perforated plastic sheet


A custom built stand for the roll of fiberglass


The finished hull mold covered in the green (again the eyes may be lying...) plastic vacuum bagging material. All of the layered sheets had to be specially cut to best fit the shape of the hull.


The air pump we will be using for fiberglassing courtesy of Carnegie Mellon SAE Racing team.


A finished practice model. This was made with four layers of fiberglass. It will be auctioned off as a collector's item in the near future.


Two foam models created to practice the proper fiberglassing technique


Mike (left) smiles for the camera as Nat (center) looks over the model boat


Llui (left) and Mike (right) discuss a fiberglass and wood sample to be used on the transom (rear/stearn) of the boat.


Lluis demonstrating the process of removing foam and bondo from hardened fiberglass. We are trying to preserve the mold for future years, but the verdict is still out on if it will be 100% possible.

Josh (left) and Brian (right) look over designs for the steering mechinism.

-Andrew

March 17, 2007

Halfway there

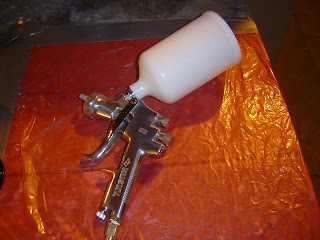
All the work we've been doing here during Spring Break is paying off. We have moved away from bondo-ing the hull (for now) and have begun priming the plug. We are priming the plug to get an even smoother surface to lay the fiberglass. The smoother the surface, the better the final hull will look and the easier it will be to separate the fiberglass hull from the foam plug. We used spray paint gun after instruction from the ever talented TC Schwindling. It proved to be faster and more environmentally friendly than many cans of spray paint.
We have continued to work on welding the motor mount frame and should be finishing soon with that. Supplies for fiberglassing have begun to come in the mail along with a new E-Tec motor and larger motor controllers.
As classes start on Monday and team members begin to return from exotic Spring Break vacations, we will continue to work on the various parts of the project. We will rehearse fiberglassing the hull several times before doing the real thing. Practice makes perfect!

And now for some pictures (and a video or two)...


A before picture of the finished boat. Most everything we need is inside.


Andrew Moore uses our new spray gun to prime the plug.

Andrew Moore and Josh mix and pour the paint into the gun. Josh claimed the recipe for the paint has been in his family for years.


Out new toy!

Someone stole my camera and caught me painting the boat.

After using a grey primer, we painted the plug black to more easily see any blemishes.


Josh cooks up some sausage for our mini-inside-bbq. They were quite tasty!


Will (left) and Mark (right) fine sand the plug. After each coat, we sanded the whole boat to try and get the smoothest painting surface possible.

Will (left), our advisor, Dr. Susan Finger (center), and Mark (right ) sand and dust the painted plug.


Mark confirming the safety equipment's effectiveness.


Will painting the plug


A virtual tour of the paint tent

That's all for now,
-Andrew

March 15, 2007

A quick demonstration

Just a quick post with a video of Josh mixing the bondo compound.


-Andrew

Almost there...

Yesterday we continued spackling the blemishes on the hull's surface. Along with filling in the imperfections, Andrew Moore and Elizabeth teamed up and worked on the shaping and smoothing of the keel and the splines (keel=center of the hull, splines=rounded edge between the bottom and side of the boat). With careful bondo-ing and sanding, they got the job done. Hopefully today will be the last day of applying bondo. The next step in making the plug smooth will be applying paint.
Speaking of paint... Last night Josh, TC, Will, and I constructed a paint tent for the boat. The tent is about 8 feet tall and has over 500 square feet of plastic surrounding it. The purpose of the paint tent is to keep the 'boat yard' safe from over spray but also to enclose the fumes involved in painting.
Speaking of fumes... We are working in conjunction is Carnegie Mellon's Environmental and Safety Dept. to make sure we are not breathing in hazardous fumes. They placed a machine in the 'yard' that monitors and records various substance concentrations. Safety first!

And now for pictures...


Will works on making the jig for the motor mount. The jig helps keep the part together when welding


Close up of the jig


Finish jig for the motor mount


The keel with a fresh layer of bondo


Josh and Andrew making sure the bondo is the right consistency. Do not try this at home


Elizabeth sanding down the keel.


Aerial view of the hull after the keel and splines have been refined


Josh, Andrew, and Elizabeth taking a well deserved break from sanding


This device check the air quality. The modern day canary if you will.


TC and Will taping a seam on the plastic covering to be used on the paint tent


Me attaching the platic sheet to one tent post


TC really enjoying himself while laying the sheet over the boat. Will in the background attaching the plastic to the posts.


Me trying to get rid of the saggin plastic. Will still in the background now making sure the plastic stayed draped over the wire.


Solution to sagging plastic: Attach string through the sheet and to the 5 ton crane above. I hope it holds...

That's all for now.
-Andrew


March 13, 2007

Sanding, bondo-ing, and more sanding!

The last few days have been devoted to making the plug as smooth as possible. To do this, we have applied roughly 10-12 gallons of bondo compound. Yes, this is a lot of bondo, but I'm also talking about a sleek and speedy 17ft solar boat!.
With each layer of bondo, there is a long and exhausting sanding period. Luckily we had ample bodies to do the work. Visiting siblings and friends have joined in the fun. With the nice weather, and people out and about, there have been many a passer by looking to see what we're up to. Because of the excellent location, there is always a steady stream of people passing by. A lemonade stand is in the works to help raise funds for the long trip to Arkansas in June.

And now for the pictures:


Otto applies the first layer of bondo to the foam


Josh attacking the bow of the mold with bondo layer #1


The three Moore brothers (triplets actually... I affectionately called them Andrew1 Andrew2 and Andrew3 - sorry guys)


Andrew1, Elizabeth, Me, Andrew2, and Andrew2 (left to right) working on the bow of the plug


Elizabeth perfecting her bondo spreading technique.


This is the view from the high bay doors. Not bad eh? (Wean Hall to the left and Hammershlag to the right)


The hull plug after the the application and sanding of the base bondo layer


Elizabeth, Isaac, Josh, and Andrew1 look for blemishes in the sanded bondo


We circled all the areas that needed a touch-up, but also contemplated a zebra design for the final hull paint job.


Andrew Moore doing some touch up work.


The wild, and often crazy Josh Sztul


Elizabeth, Will, Andrew, and Josh touching up the plug


SPECIAL SNEAK PREVIEW!!!
The following two pictures are CADD models (in SolidWorks) of the finished 2007 boat.


By the end of the week, we hope to finish the plug so look for more building/construction pictures soon!

-Andrew